Somehow it still seems wrong, at least until I feel like I'm at a size I can live with.
In the meantime, I have to either buy used or work with what I've got, which is proving to be more annoying than I thought as my weight fluctuates.
At the moment, none of the pants I own are fitting properly. I'm smaller than I was a year ago, but larger than I was 6 months ago, and the one pair of "in between" jeans I was wearing suddenly grew a grease spot on my way to work one day.
How embarrassing.
I do, however, have one pair of pants that fit me really well at the moment, except for one thing -
the length.
Almost every pair of pants I own is too long, and I just wear them anyway. For some reason, probably because I spent a little extra dough on them (although never full price, of course!), I had these Joe's hemmed.
Well, the seamstress shortened them a little too much, and since then I've been self-conscious about the length. Plus they are flared, which is not really on trend at the moment. Put the two together, and what have you got?
Silly pants:
 |
| These pants look ridiculous! |
Ok, so maybe they're not completely terrible. But I don't care what you think.
I didn't like them. So I barely wore them.
But suddenly they were the only pants that fit properly in every other way, so I decided to try and make them work by tapering them into straight-legged ankle pants, which I find much more appealing and flattering.
I started by estimating where a straight leg would lie, pinning, and trying on.
I decided the best approach would be to make the alterations to the inseam, since there was already topstitching there that I could mimic and use to my advantage (I also think there's nothing worse than obvious alterations to jeans - maybe that's just me again).
 |
| Left leg folded and pinned to test for fit. |
Once I had determined this would actually work, I started ripping out the seams.
 |
| Seam rippin' with my industrial tool - I had to be careful not to rip through the fabric. |
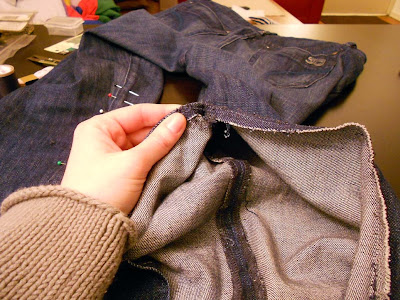
I went up to the mid thigh - this way I could keep some of the original stitching, and blend in my alterations to keep the original integrity of the jeans.
 |
| Removing the seam to mid-thigh. |
 |
| Goodbye, flares... |
I trimmed the excess thread from the original surge and started pinning in place to stitch.
 |
| One leg down, one to go! |
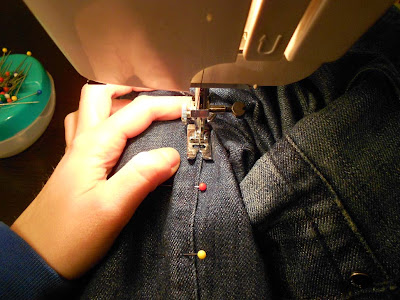
Using Coats and Clark Dual Duty XP Heavy thread in Navy and a size 16 needle, I topstitched the inseam. I started at the top rather than at the ankle, to ensure a smooth transition from the factory seam to my new one. This was a little tricky because it meant bunching the entire leg around my tiny sewing machine as I went.
 |
| Getting situated. |
I used the rut from the original stitching as my guide as I worked my way down.
 |
| Following the rut. |
Phew! The second leg went a lot faster than the first one.
 |
| Finished leg sproinging free. |
And voila! I now have a pair of non-dorky pants that fit!
 |
| Me in less-dorky pants. |
I did this all in a couple of hours for the cost of the spool of thread - less than $3.
Have you ever gone "shopping" in your own closet? Find anything good??

No comments:
Post a Comment